Showing posts with label pre cbs fender amplifier. Show all posts

Monday, November 29, 2021

1965 Fender Vibro Champ Amp, low volume, What are some people thinking when they mod an amp????


This was a repair amongst many I did for Southside Guitars last month over a marathon 2 day period. Simple amp, somehow it took up more bench time than the rest!


You're looking at a run of the mill used 1965 "Fender Electric Instrument Company" pre-CBS Vibro Champ. Lovely little buggers. The first time I ever played one was at this guys apartment in the 80's in Boston. He used a TS9 Tube Screamer into it to record my guitar tracks when I was a Berklee student. I was pretty floored at how good it sounded. I think he had a reel to reel or one of those cassette 4 track machines we all had in those days, the Fostex X15 or Tascam something or another. 


Anyway. This one had very little volume. I popped the chassis and, well, you tell me what you see:


Yeah. Seriously. What the eff? That nice bit of lamp cord poorly soldered between the input of the volume knob directly to the 15k midrange resistor which goes to ground. So where you want to see up to 250k between you and ground, you get 15k maximum. I just don't understand what they were trying to achieve here! Did they put it together and say "Yeah, now that's the ticket to Hollywood baby?" 

Why didn't they just undo it? Ugh......

That was the first thing to take care of and while it helped tremendously, there were plenty of other bugs.

Always start from the back and go forward. The speaker was an old alnico full range 8 ohm job with a whizzer cone. That wasn't helping any so I just threw in what we had that day, a reissue 4 ohm used Jensen Alnico speaker. That helped but still, meh.... blah.... lackluster. No bass at all.


They had replaced every single signal capacitor with used / leaky weak caps that were also the wrong values. I used Mallory 150s and if you notice, I grounded the amp and used the .047 "Death Cap" at the midrange capacitor cuz, why not? Reduce reuse recycle! And those never go bad and have a special sound. 

I also replaced the tremolo caps with fresh ones as that was super weak and they had some weird stuff going on in there too. 

But still, no bass and pretty sad tremolo.

Cathode caps..... no bass, sad tremolo. Tremolo is just an LFO right? Better have fresh cathode caps to get it strong. In fact, just replace them already! This amp is 56 years old now.

After that I still wasn't happy though. Tremolo was working albeit, just not awesome, and the bass would vanish when you turned the treble up. Weird......

So upon closer inspection I noticed the tremolo intensity pot was dated 1966, but no indication of the ohms. They always say 25K RA. So I pulled it and measured the thing. 500k. WRONG! 

I dropped in a 50k pot since that was all I had on the shelf. Those 25K reverse audio pots are hard to find. The 50k pot isn't correct but it did make the tremolo work better. With the 500k pot there was almost no tremolo until you got up to about 8. So, while not satisfied this would work. I could also bypass it with a 47k resistor to make a fake 25k pot. I don't like doing this but in a pinch it does work and only the rabid amp fanatic can usually tell.

But that treble control bit was really driving me bananas. The amp still seemed weak too. So I then figured if the Bozo that modded this amp changed that tremolo pot to something so wack, maybe they changed a tone pot.

They didn't. The tone pots are the original 250kA pots dated 1965. 

So I checked the volume pot. Lo and behold, it was the 25K RA Intensity pot I needed! Captain "Wha? TechNo No No" used the 25k pot and scrapped the 1Meg pot that was in there. I took that 25kRA pot and put it where it belonged and threw in a new CTS 1 Meg volume pot. 

Now we're cooking with grease...... GREAT tremolo and GREAT tone!

The power transformer was replaced sometime in the 70's with the correct part. I did clean up the wiring there too. Come on folks, twist those AC lines already!!

In conclusion. I do not know what this person was trying to achieve with the mods they did. If they were trying to make the amp play with little volume, why not just turn the volume knob down? I imagine they may have been trying to get more tremolo so they used that 500k pot. Nope! 

If you do not know what you are doing then please consult someone! Otherwise a fella like myself can spend hours undoing your ill conceived ideas. Seriously, ask. Most of us are happy to share information....

J


Monday, March 29, 2021

1964 Fender Deluxe Reverb. Re-capped but still too much hum. What can I do?

 Here's the desert island amp for many of us and I think after all these years I'm one to be on that island myself. A really clean 1964 Fender Deluxe Reverb. 


About the amp: Transformers are original, speaker was replaced with a Celestion G12M greenback 30 watt. I'm a fan.... Amp was re-capped well enough. All of the electrolytic caps were top shelf expensive Sprague Atoms. Some of the work wasn't exactly tidy but done well enough.

But, I just didn't like the amount of hum I was still getting. I right away saw some things to improve. First is the bias supply cap:


Whoever re-capped this amp went with the original value. I mean, why wouldn't you. That's what Fender used in 1964 so.... 

Nah. When I worked for Jeff Bober in 1994 he just told me to upgrade it to 100@100v rather than 25@50v. I've been doing it ever since. Better regulation and less hum. I do not detect any change to the sound of the amp and I have well trained ears. And for what it's worth Fender upped it later to 70uf then 100uf cause they could. Caps got a little better. So just do it. If you think that's blasphemy try it anyway and put the old value back in if it freaks you out.

Yup, being dramatic here but I'll share a story. I once had a client who paid me to convert an AB165 Bassman to an AA864. That's no small task. Big job. I made one mistake and one executive decision. He took the amp home and inspected the work under a microscope. The next day I had an irate customer who brought his amp back and he (understandably) expressed his trust had been burnt. So I gladly changed the one pot value that I missed to the correct one. But he was really upset about my little executive choice: using a 100@100v for the bias supply. I explained to him why I did this: with a 25@50v cap it will hum. He didn't believe me one bit and I could tell I was losing his business.

So we gave it a listen, I then replaced it with a 25uf cap.... HUM! And not a teeny tiny difference. It was significant enough that he heard it and looked a bit embarrassed. He asked me if it would make a tonal difference and I said no but if he thinks it does bring it back in a week. I put my little 100uf cap back in, fired it up and he was happy with the quiet. I never saw him again. All is well that ends well!

So here ya go. Use a pretty blue Philips Vishay cap if you will! I like them cause they look nice and European:


But wait! We're not done yet. Amp was much improved but I still wasn't 100% satisfied. This next part involves the signal caps.

If you have been inside as many old Fender and other high quality amps you'll notice even the signal caps have a direction. No they're technically not polarized like an electrolytic cap is, but there is a direction you want them to go in. The have an inside foil and an outside foil. Some old caps like my favorite Ajax blue capacitors you find in Fender amps even tell you which side is the outside foil.

Rule of thumb: always have the outside foil closer to ground. In other words, if one side of the cap is on the 100k plate load resistor and the other is connected to the 1Meg volume pot, outside foil goes on the 100k resistor. Fender almost always got that right! I've only seen a few exceptions. 

Another example is the tone stack. The .1 bass cap goes to a 250k pot and the .047 mid cap goes to a 6.8k resistor. On the other side is the 100k slope resistor then the 100k plate load resistor for a total of 200k. So the bass cap should have the outside foil attached to that slope resistor and the mid cap should be going the opposite direction with the outside foil connected to the 6.8k resistor on the bass cap. Like this:


The phase inverter has three .1 caps. Two are connected to the plates of the 12AT7 while the third is connected to the grid. On the plate load side you have a 100k and an 82k resistor going to each plate. On the other side you have two 220k resistors going to the bias supply. So the outside foil goes to the plates, inside to those 220k resistors. The third cap however is connected to a 1meg resistor on one side and a 47 ohm resistor going right to ground on the other side. So that cap goes in the opposite direction. In this case the previous owner used my least favorite cap, the Sprague 715P. No indication for inside or outside foil so you just read it from left to right. It will look like this:


Notice how the print is going in the opposite direction.........

Here's the dry channel tone stack. I had a spare old polyester orange drop cap that has a stripe on it for outside foil. The mid cap you'll notice reads left to right with the left going to the 6.8k resistor. If you are experienced you'll notice the .047 600v blue Ajax cap for the final stage. Sadly entire channel was orange dropped. But I have a bag of .047 Fender "Death Caps" from the AC balance. I never throw these out when I ground an amp. I save them for classy amps like this one!


One cap backwards will not make all that much of a difference but in this case I counted 5. It adds up. In the hundreds of old Gibson and Fender guitars I've seen over the years, the tone caps are almost always done in this arrangement: outside foil to ground. If the good people at those companies were sticklers for such a detail on the treble bleed cap, there's something to it.


So there you have it. The amp behaves like my own '69 model now. Quiet! Of course it's not possible to eliminate all hum and noise but it is possible to reduce it using these little steps. And the less noise the more music dig?!


Thanks for reading, hope this was helpful and feel free to leave a comment of ask a question below! J


Thursday, December 10, 2020

Hum reduction in a 1965 Fender Vibrochamp, fix that filament line!


This article is about a nice player grade 1965 "Fender Electric Instrument Company" Vibrochamp that came across the bench. However, this applies to many other amps out there.

This amp came to me in reasonably good condition. Speaker was replaced with an 8 ohm (I installed an early 70's 3.2 ohm Jensen) and the output transformer is long gone and was replaced with a classy Mercury Magnetics Tone Clone. It had been re-capped reasonably well and this included the signal caps. I like pristine amps but I kinda like ones like this a bit more. I don't feel bad about making improvements in such an amp, and I know it will not sit in a museum after it leaves, it will be used in a living room or someones studio as it was meant to be. These amps are no longer cheap so I do my best to make them as functional as possible.

So the trouble was even after a re-cap it still had a good deal of hum. That's actually not all that unusual on one of these and it's challenging to get the hum out of a class A single ended amp to begin with. The trouble with these lies in the filament line. To cut cost on this little student amp Fender grounded one end of the filament line along with one side of the filament in each tube. This creates a wide and kind of stupid path and eliminates the hum reducing effects of having a twisted filament line as you see in anything from the Princeton on up to the Twin.

This is a pretty easy thing to fix. An experienced tech can knock it out in about a half hour.


So first thing locate the green wire that is going to ground near the filter caps. That is one side of the 6.3VAC filament line. Un-solder it or simply cut it. It's soldered to the same point as the center tap on the high voltage line (red with yellow stripe):


Next unsolder the tab on your pilot light that is connected to the housing which is ground:


Take the green wire that you disconnected from ground and solder it to the tab you have liberated from the pilot light:


Now add the wire you will be using for the other side of the filament. I use high quality cloth heavy gauge wire for this. It's nice to work with and it looks classy. Some day someone will open this amp up and I'd rather have it look good when they do!  Here's a link to the good stuff....


Added wire:


Next disconnect the ground wires attached to pin 7 on the 6V6 and pin 9 on both 12AX7 tubes:


Remove them:


Now add the green wire and carefully twist it like you see in bigger amps. You want it to float above the tube sockets and drop down over them. 


Now for the all important ground reference! The original Fender power transformer has a center tapped filament. Woo hoo! You'll likely see an extra wire that is green / yellow just taped off with electrical tape. You will need to extend it likely. Do that, add heat shrink tubing for safety and simply solder it to ground:


Now this is one method of creating ground reference. It's actually not my preferred method. I like using a 100 ohm pot across the filaments with the center tap either going to ground or to pin 8 (cathode) in the output tube. You can really dial it in this way. But if that's not an option you can also just use 2x 100 ohm resistors across the filament to ground or to the cathode. The advantage is safety. If your 6V6 plate shorts to the filament and your fuse doesn't pop, you'll burn up those 2 resistors rather than burn up your 6.3v heater winding, thus destroying the power transformer. Better to burn up a couple bucks over a transformer that cost a C note or better and making your hip amp even more "player grade" than it is.

As an example here's what it looks like, 100 ohm resistors going from pin 2 and 7 to pin 8:


This is an arrangement you see in a lot of old hi-fi amplifiers. My own hi fi amps have this arrangement as well.

Now, will this eliminate the hum? In my experience, no. But it will greatly reduce the hum. Can the hum be eliminated? It likely can by converting the 6.3VAC to DC with a bridge rectifier and voltage regulation. But why bother. It's a guitar amp that was never meant to be perfect. 

Now I have done this mod (described in this article, not DC conversion!) in push pull amps. One is the very well built and classy Guild 66J. Nearly silent. The other of note is the not well built and trashy Silvertone 1484. A customer pushed me and pushed me years ago and lo and behold, this made him happy. Quietest Silvertone on the planets. And if you are going to buy a Guild 66J (very under-rated!) buy this one:


It's one I had the pleasure of working on. Brand new expensive filter can and quiet filament line.....


One other thing of note. I did replace the cathode bias resistor as it was burnt up real good..... I like to use a 5 watter myself. These old Champs run very hot. You can experiment with the value on this resistor. Try going up to 750 ohms or better. This may, and I haven't tried this myself, reduce some hum as well. The 6V6 cooks in a typical Champ. The later 70's ones in my experience can really burn through tubes. If this is a problem for you that is worth having a look. 

If you notice I always separate the cathode bias resistor from the capacitor. This is to reduce heat getting on that cap. With the standard 2-3 watt resistor people like to use it gets very hot. I've seen it melt that cap literally. Again with some 70's amps the little white cap is almost always melted! I also always go with a 50V or better cap in this position. Just from experience, if it's a hot Champ a 25V cap may blow up, literally! And if you do experiment with a higher value resistor please note the voltage will rise on that cap.


Once you are done remember always use a Variac or a current limiter to test your amp. Remove the 5Y3 rectifier and make sure your filament line is good before adding the high voltage. Tubes should light up as well as the #47 pilot light. 

And I cannot stress enough, safety first. Always double check your work as you go along. I just had a 70's Princeton with so many errors in it, big errors. Go slow and if you don't feel comfortable doing this kind of thing, pay someone with a good reputation to take care of you! Your amp wasn't cheap and it's worth it!

J


Wednesday, September 16, 2020

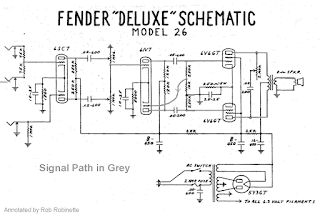
1947 Fender Model 26 "Woody" amp

 I thought I'd share about this one.... very rare bird indeed. A Fender Model 26 "Woody" circa 1947.


This came through Southside Guitars with the matching lapsteel. Unfortunately both transformers were destroyed. The good thing is I managed to buy some period correct NOS iron that worked perfectly. I don't think one needs to be too precious in what iron one uses as I believe Fender used what was available in these early days. I could be wrong about that but either way the amp turned out to be fantastic sounding.


I needed to replace every capacitor in the house and some resistors. Curiously rather than using a 250 ohm 5 or 10 watt resistor for the cathode bias circuit, Leo used 2 500 2 watt ohm resistors going from pin 8 to ground with a wire connecting the two with a single 25@25 volt cap on the board. I replaced those with some pretty NOS 500 ohm 5 watt wire wound resistors. 


The speaker was shot but original so I had it re-coned. Always the best choice I feel, especially with these. There is no place to mount the output transformer except on the speaker. Worked out nicely!


One peculiarity with this amp is the tone control. It's the worst I've ever seen. It's a 2 meg pot and a .05 capacitor going across the anodes of the 6V6 tubes. Oh, it worked, very dark, turn the pot then like a switch it's full on. That goofy taper doesn't actually bug me but what does is when you blast the amp you can see sparks inside the pot! I asked the owner if I can wire it somewhere else in the circuit, like a normal tone control. Better to not have an amp flame up. It's fine at moderate volume but who wants that with a little scream box like this????

I can say this amp sounds incredible. Very colorful, very rich and quite loud. More "primitive" than a later Deluxe and has a focused sound with that 10" Jensen speaker. 


One that is worth building if you are into that sort of thing. Experiment with that tone control I say!


Schematic:


Old school construction!!!! :


Original Jensen dated 1946.....


Wednesday, April 3, 2019

1963 Fender Vibroverb. One of the rarest of all.


I had the honor to work on this old Vibroverb last month. At first glance I thought is was a reissue model cause it's so clean. I looked at it again and said "No way!" thinking it must be a kit. Then I realized I know the owner and he has pretty fine stuff.

I've never seen one in person. This goes on my bucket list of rare Fender amps like the 3x10" tweed Bandmaster here.

Amp was blowing fuses. The filter caps were bubbling so I replaced them but unfortunately the problem was the reverb driver transformer was shorted. BUMMER! Nobody makes quite the same part so I just used a new Heyboer with a large washer to hold one end on. No holes needed to be drilled this way and no one is ever going to see it anyway. Easy fix.

The original part goes into a plastic sandwich bag so the owner can decide what to do with it. Paperweight or get it re-wound? He doesn't care since he doesn't use reverb anyway.

Amp sounds amazing. First model to sport those 'brick drop' caps like you see in late 60's models.

Did I mention this amp sounds amazing? I'd go so far as to say aggressive. If cost were no object....


The culprit:


Brick drops!


Original speakers. At some point they were wired backwards! I've seen this many times....


Original milk chocolate footswitch. Mmmmmmm.....